New Features Added To The EOSToolkit!!
Name Bidding and Auction Tracking, Account Creation, Proxy Voting, Vote for us and Vote tracker
As promised, we have been working hard to add new features to our EOSToolkit and we are happy to announce today that we have added in Name Bidding and Auction Tracking, Account Creation, Proxy Voting, and Vote for us. These features have been developed with Scatter signing so you can trust that your private key is kept safe and secure. If you’d prefer to review the code yourself you can find it here.
First step is to setup scatter
Step 1 – Download Scatter

First go to the official scatter website and download for your selected browser – we will use chrome as our example. It will take you to the chrome extension download page. Once here click add extension.
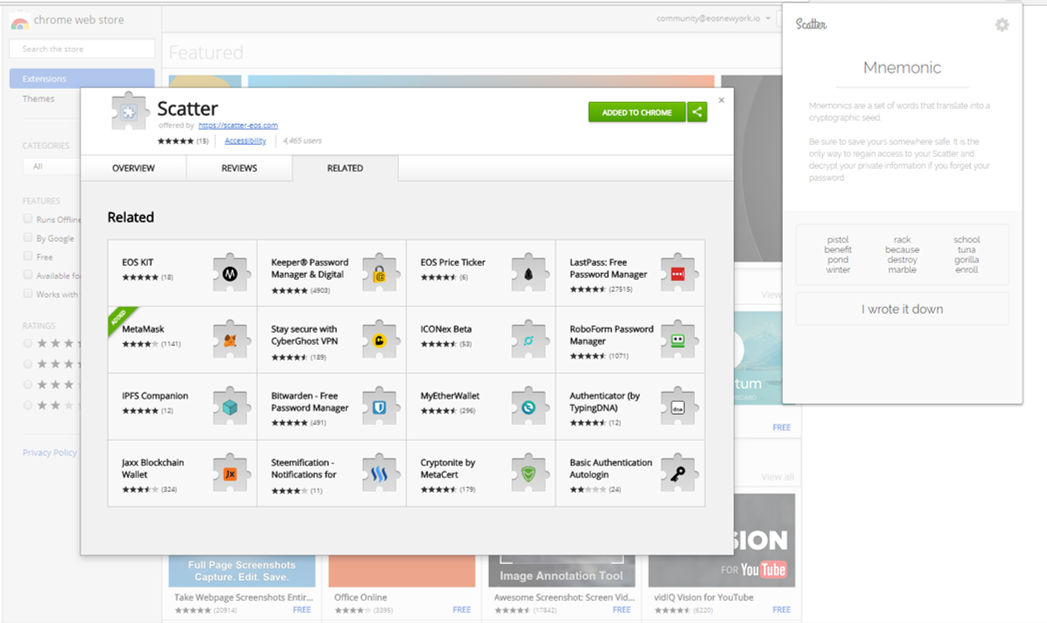
Step 2 – Validate Scatter
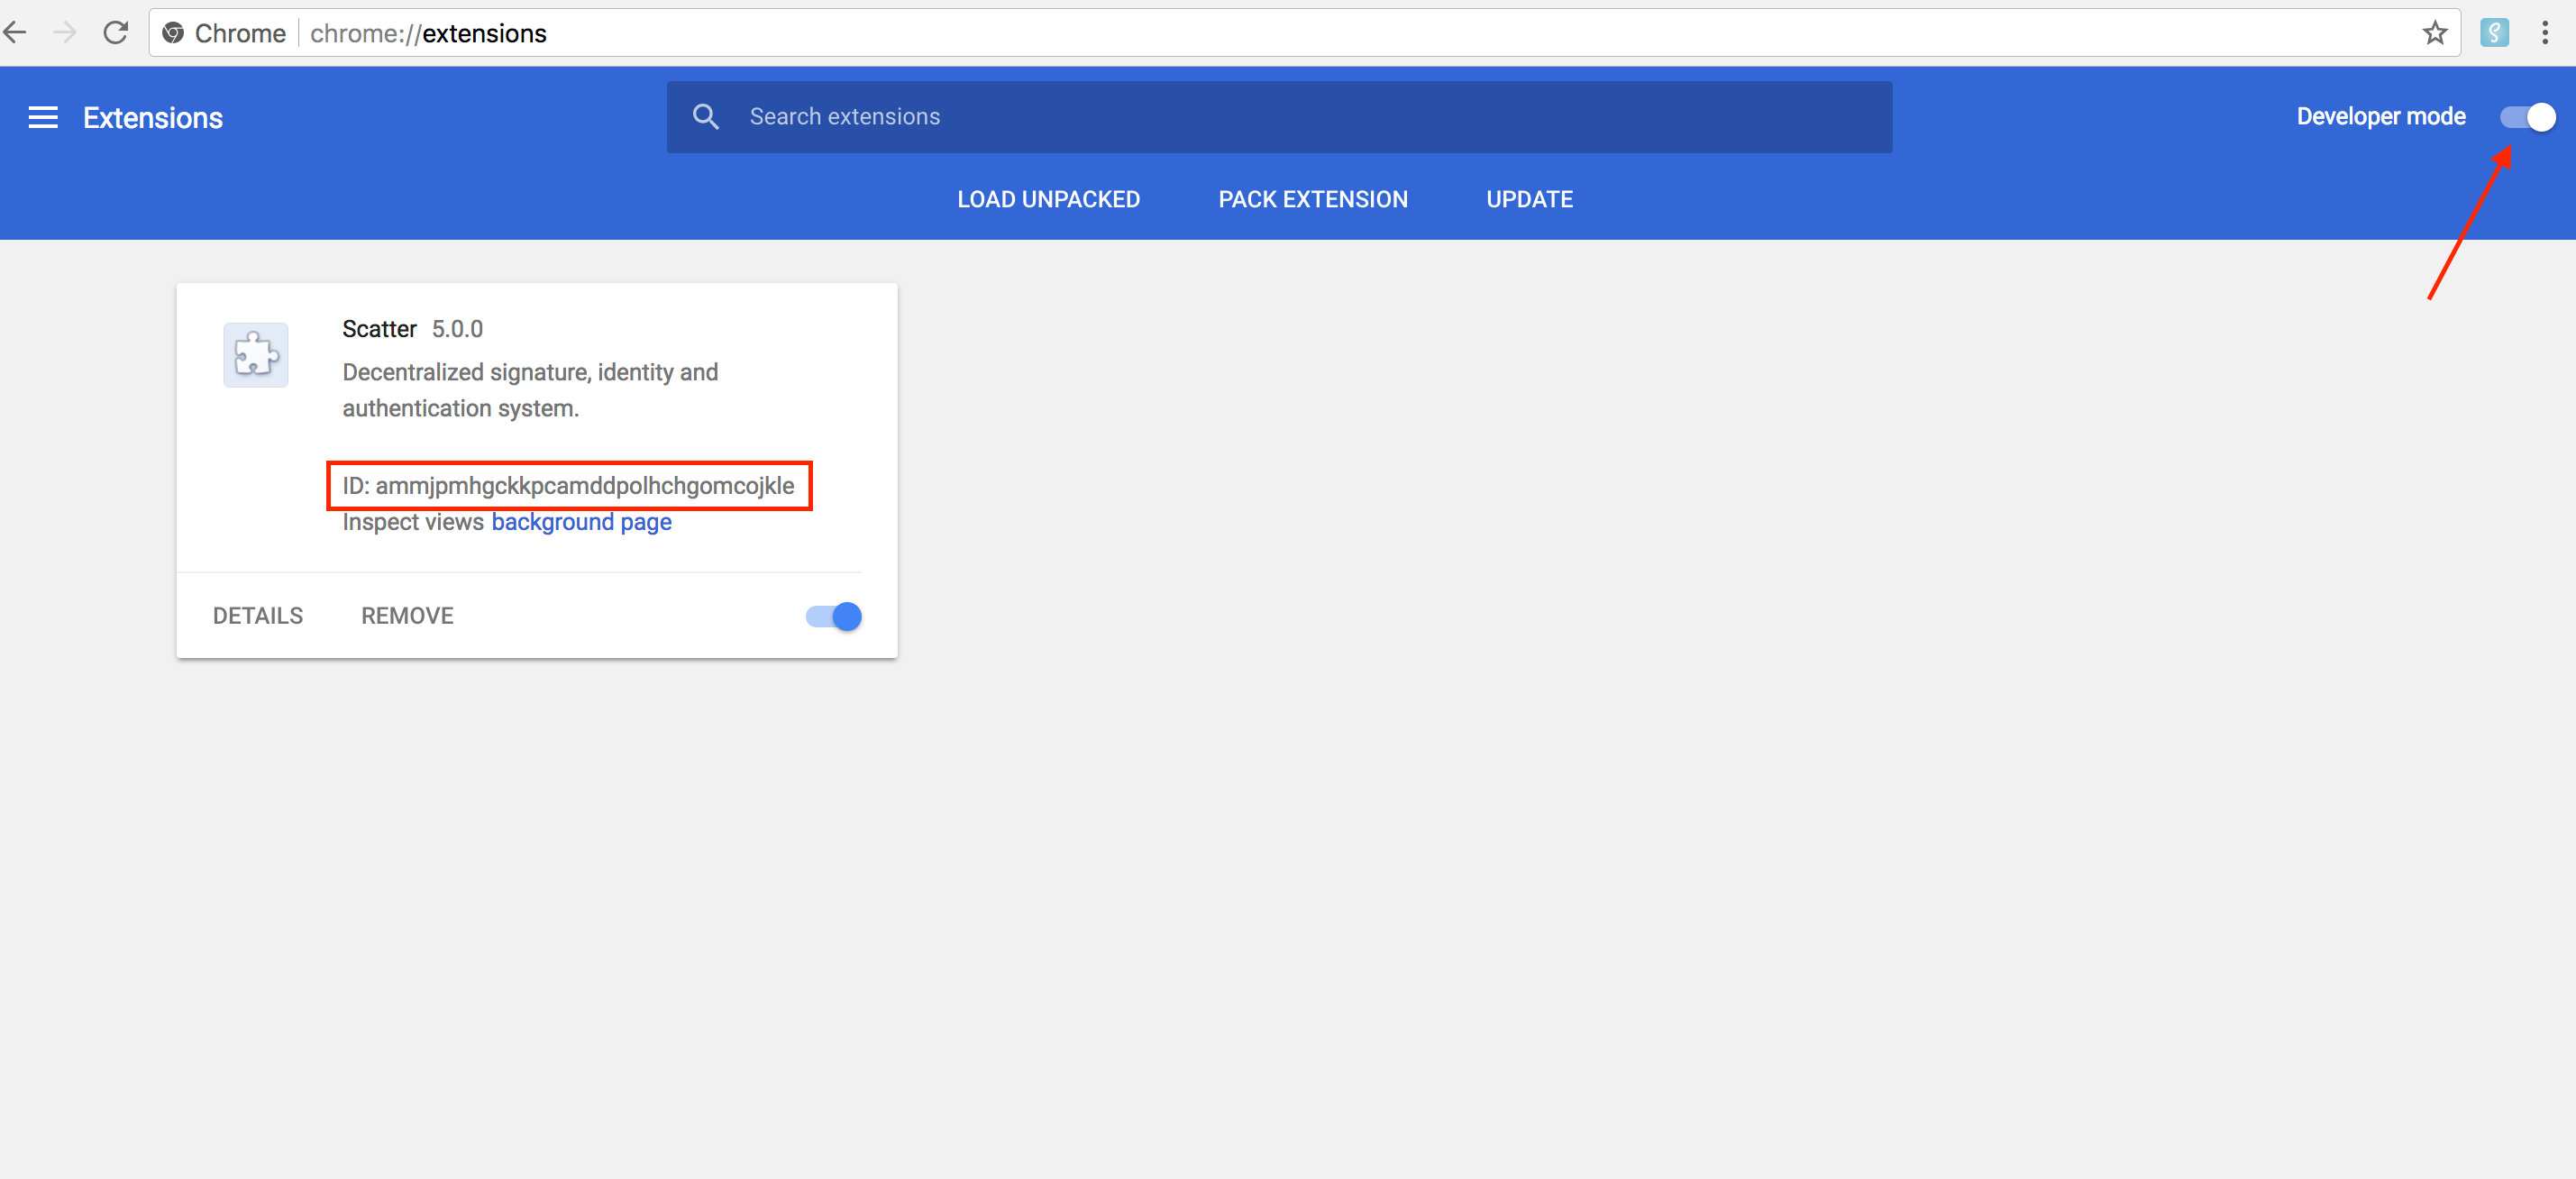
- Enter chrome://extensions/ into your browser.
- In the top right, turn on developer mode.
- Verify that the ID matches this exactly: ammjpmhgckkpcamddpolhchgomcojkle
Step 3 – Create Account
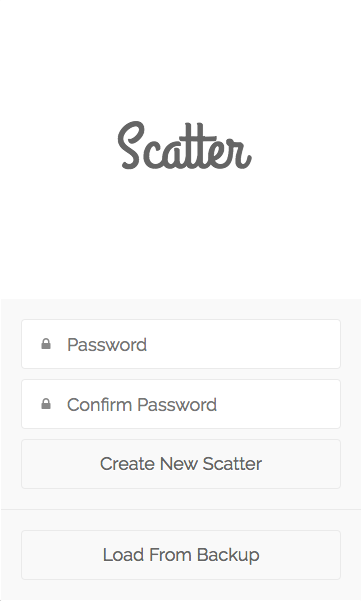
Here you will create your Scatter account. Make sure that you enter a secure password that you will not forget. You will then have to write down the mnemonic seed phrase on paper and store it in a secure place. If you ever lose your password you can use this to restore your account.
Step 4 – Import your EOS keys
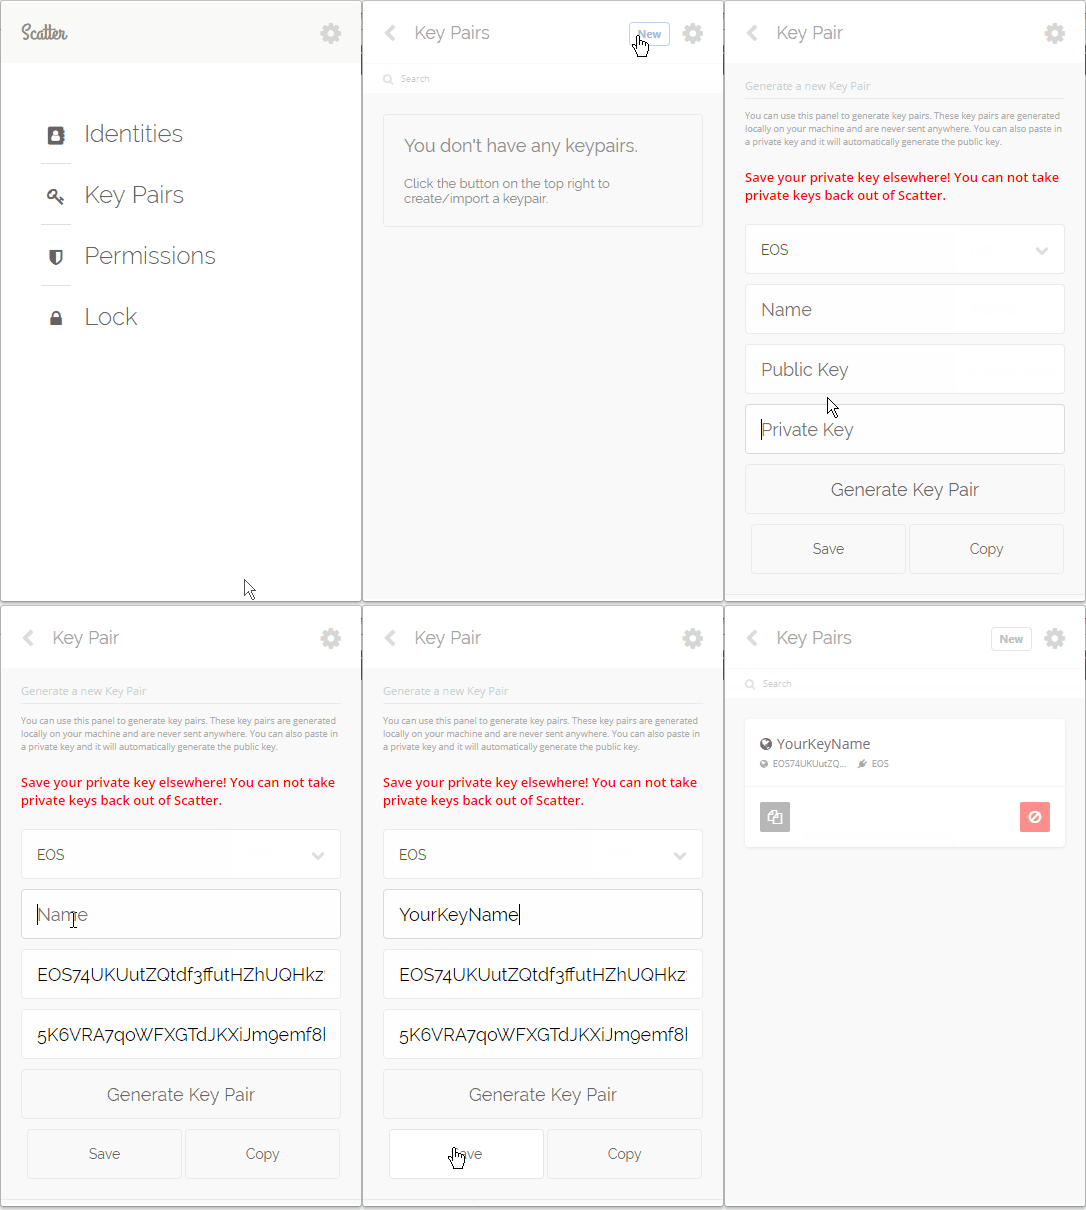
You will need to add your EOS keys into scatter to allow you to Vote, Name Bid, Create Accounts and Proxy vote.
To add a keypair, follow these steps:
- Copy your private key to your clipboard.
- Open Scatter and click the ‘Key Pairs’ option from the main menu.
- Click the ‘New’ button in the top-right corner.
- Paste your private key into the private key input field.
- Give the key a name so you remember which one it is
- Click ‘Save.’
- Once you generate a keypair, you need to save your private key elsewhere as Scatter will not allow you to open to view the keys again.
Step 5 – Attach Identity
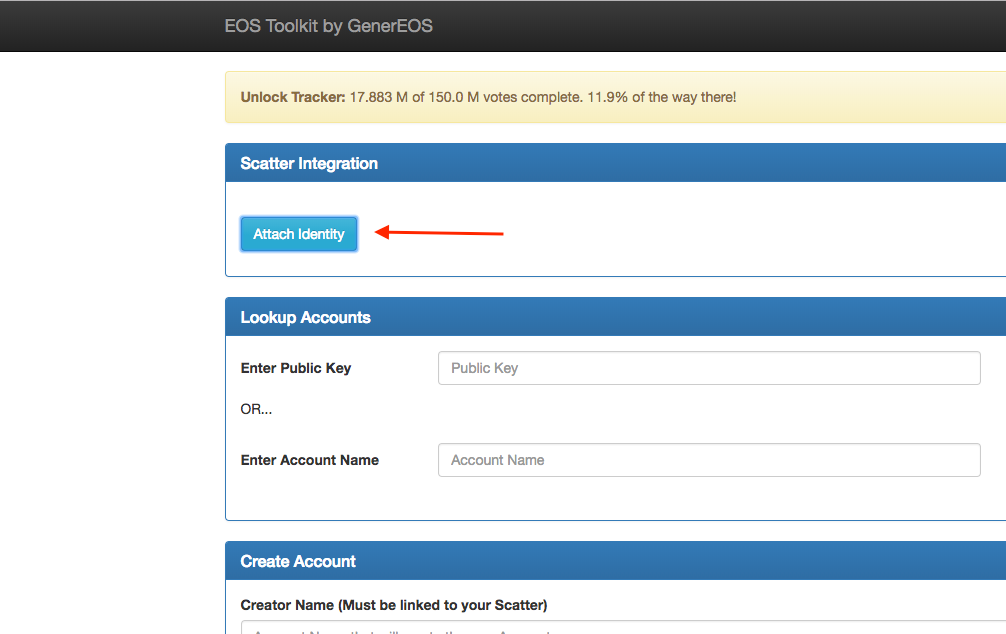
Click attach Identity which will link you to the mainnet (chain id: aca376f206b8fc25a6ed44dbdc66547c36c6c33e3a119ffbeaef943642f0e906) inside of Scatter.
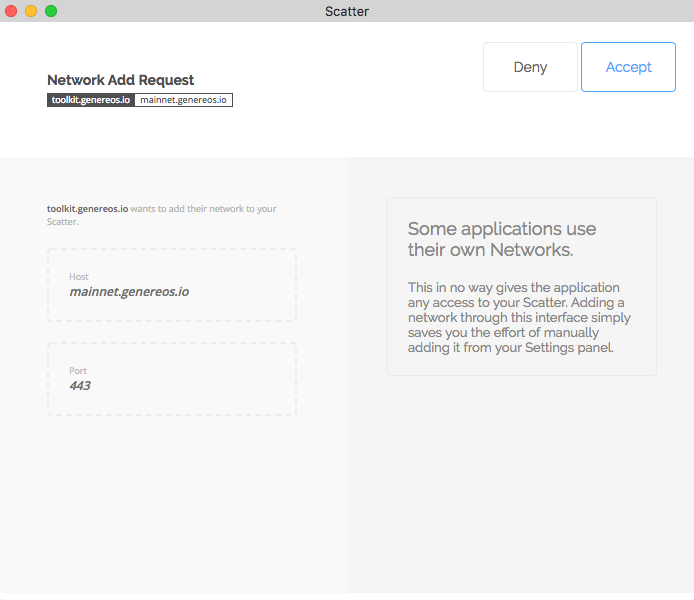
Once you accept this you can verify the mainnet has been added to your Scatter like so:
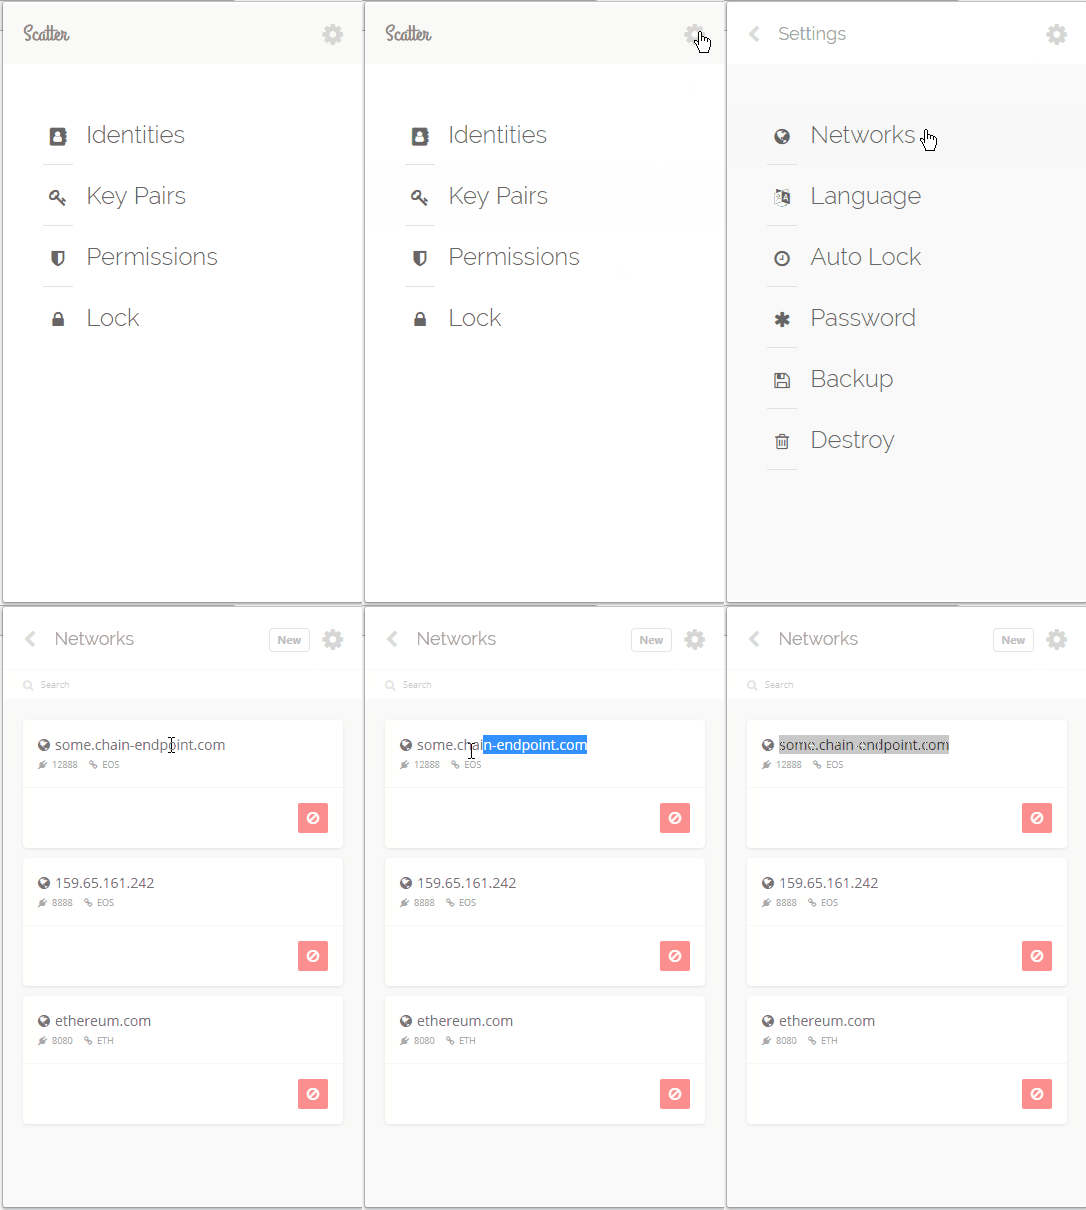
Now that you have the network and keypair inside Scatter you can import your account:
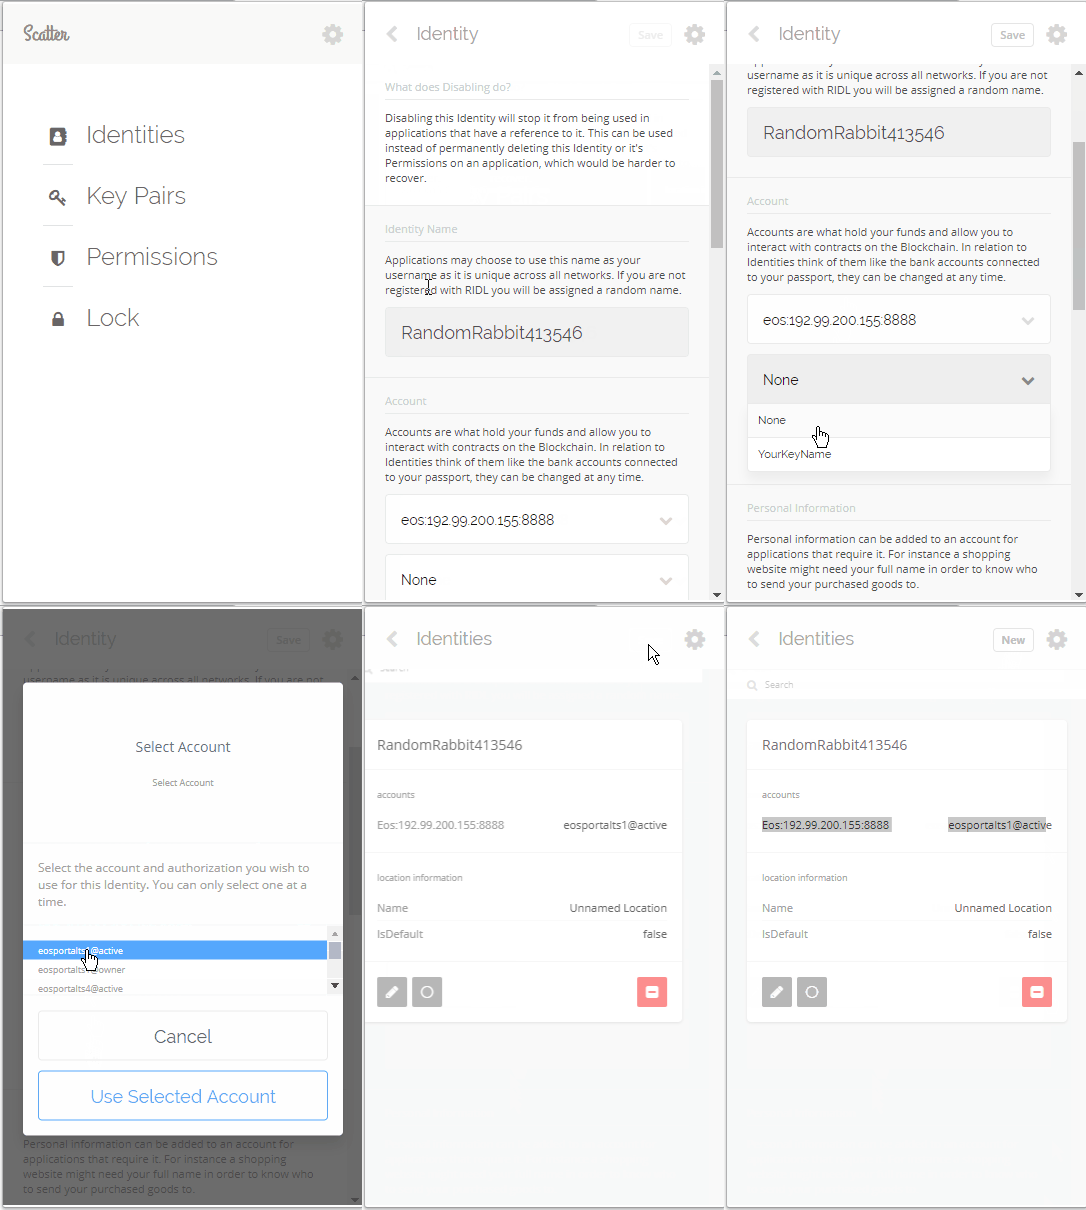
- Click Identities
- Click edit
- Go down to account selection and pick the chain you just added(chain id: aca376f206b8fc25a6ed44dbdc66547c36c6c33e3a119ffbeaef943642f0e906)
- Selected the keypair that you imported.
- Click the import button
- A popup will open with asking for you to select your account permissions – you should select @ active key. Then select use selected key.
- Prese save
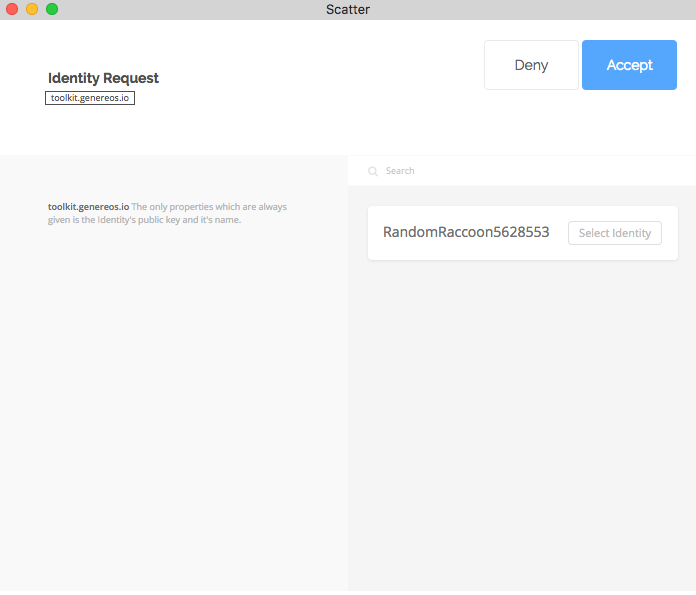
Then a popup will open asking you to select your Identity that you have created, click accept:
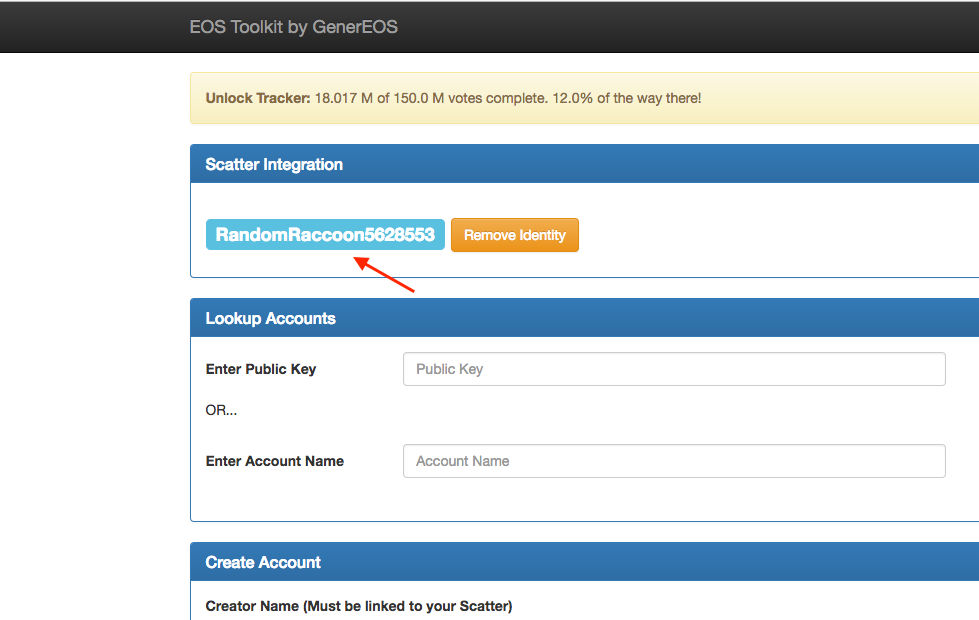
You should now see your random account name as shown in the image:
Account Creation
As long as you have access to your genesis account via your public/private key pair you can create new accounts. The only cost that is not recoverable is minimum Ram required by an account. The staked network and cpu may be unstaked later if you no long have a need for the account. Conversely, you can stake higher quantities in the future if this will become a high use account.
With this in mind, 8KB of Ram costs approximately 0.1 EOS. This means with a 0.2 EOS total stake each account will only cost you approximately 0.3EOS.
You may use the same public keys as your genesis account, or you can use scatter or other methods to generate unique keys. The same public key can own an unlimited number of accounts, however for security reasons we recommend you use multiple keys for protection if your private key is ever compromised.
The transfer mechanism must be explained:
- Transfer YES: The new account will “own” the EOS you stake it, and it will “own” the associated voting rights. This new account must vote and unstake individually.
- Transfer NO: The creator account owns the EOS you stake to the new account, and retains the voting rights. The creator can chose to unstake and vote. The new account cannot vote with this stake (but may stake its own EOS in the future).
Please read the associated ricardian contract so you know what you are agreeing to by using this action.
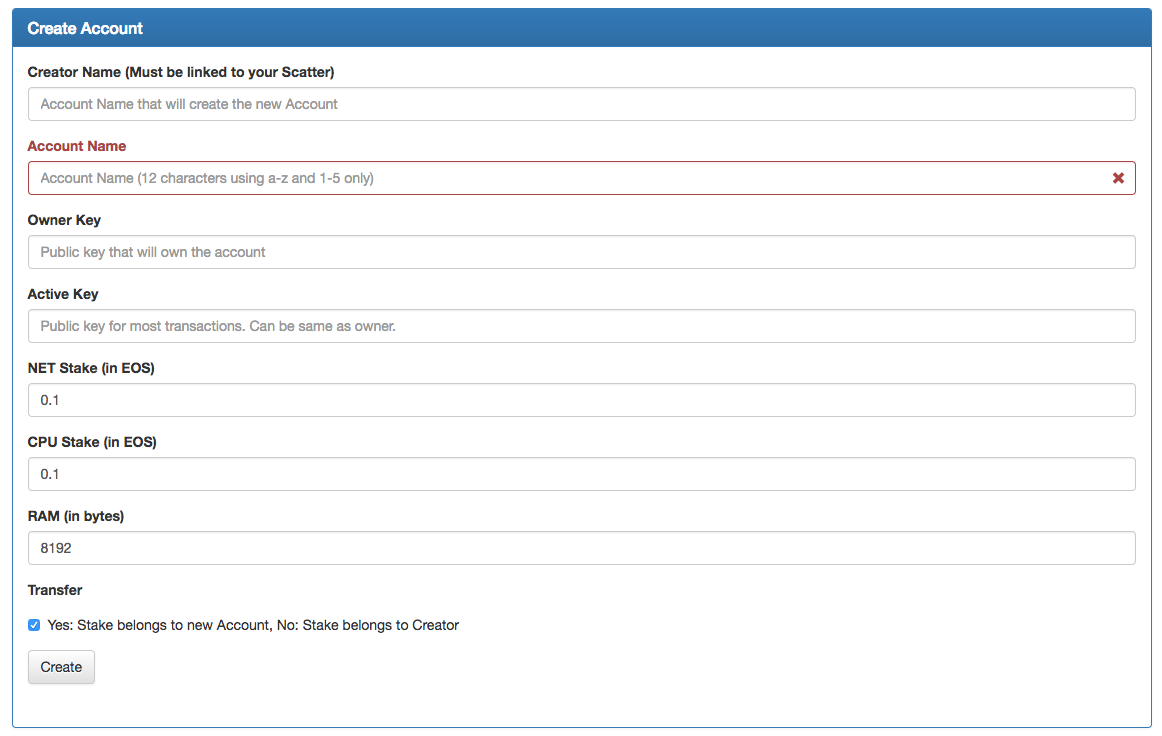
Instructions
- Head over to http://toolkit.genereos.io/
- Attach Identity with Scatter (see above for details)
- Enter your creator name – this can be found in your scatter identity section.
- Enter desired account name (12 characters using a-z, 1-5 only)
- Enter your Owner key and active key
- Stake your NET and CPU we recommend 0.1 EOS for both
- Select how much Ram you need (4kB minimum, we recommend 8kB)
- Select Transfer Yes or No
- Click create
Proxy Voting
EOS Provides the ability for others to vote on your behalf by designating a proxy. To be selected as a proxy by others you must first register as one. Setting a proxy uses the same action as “voteproducer”. Please read the associated ricardian contract so you know what you are agreeing to by using this action.
If you are a proxy: You vote with the total staked weight of everyone who selects you as their proxy.
If you set a proxy: Your stake will immediately be shifted to whoever the proxy votes for.
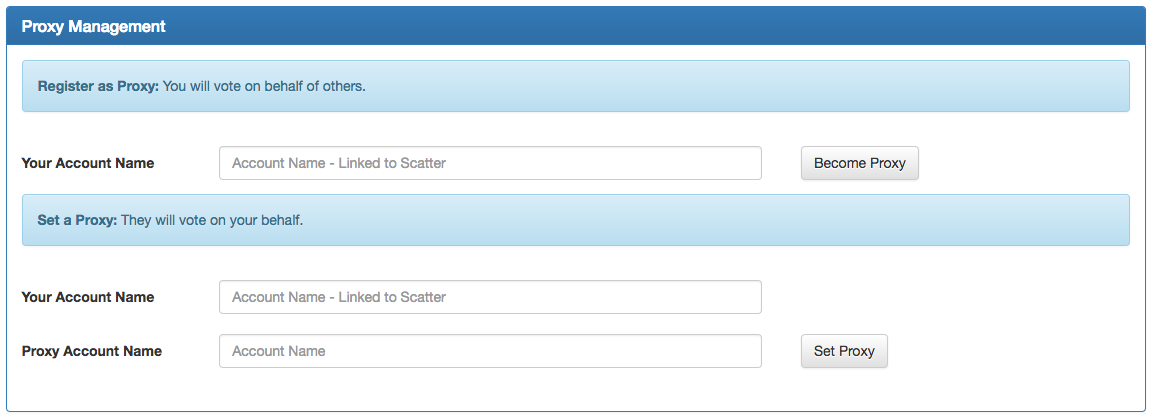
- Head over to http://toolkit.genereos.io/
- Attach Identity with Scatter (see above for details)
- Enter your account name for either become proxy or set proxy
- For set proxy enter the account name that you wish to set your proxy to
- Click “Set Proxy” or “Become Proxy”
Name Auction
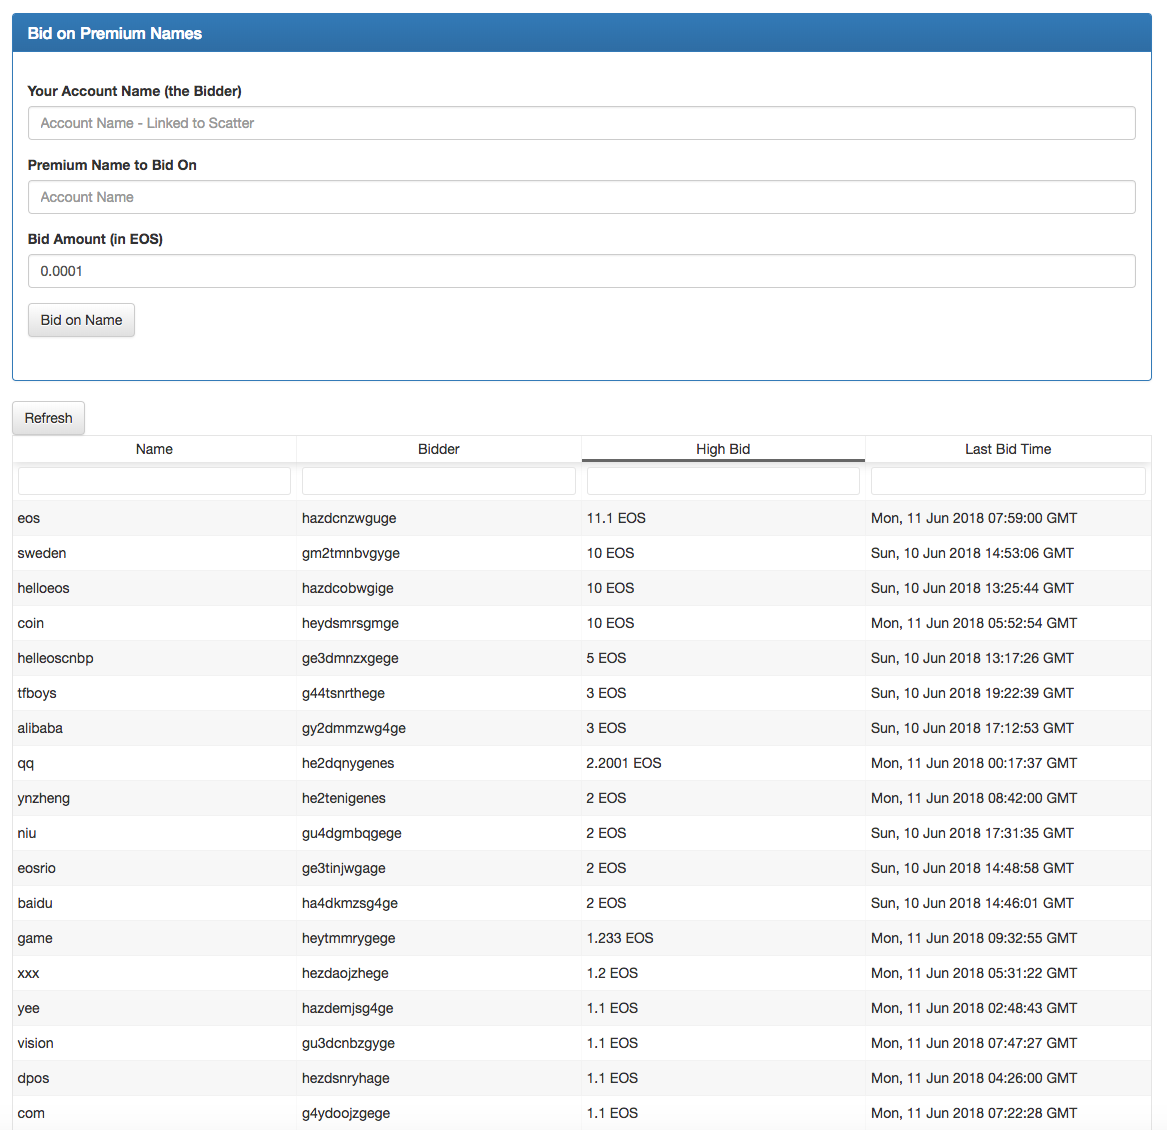
Premium names will not start being awarded until 14 days after the mainnet is unlocked (150mil votes), however you can begin bidding on them immediately. The details of this process can be found on our steemit post.
Only the highest bid name of all names will be awarded once per day. We have provided a table that shows all the current name auctions and highest bids. You can enter search criteria in the form to see if your name has already been bid on.
Please read the associated ricardian contract so you know what you are agreeing to by using this action.
- Head over to http://toolkit.genereos.io/
- Attach Identity with Scatter (see above for details)
- Enter your account name in the bidder section
- Enter name you wish to bid on
- Enter the amount you wish to bid
- Click “Bid Name”
You can view at all the current auction names in the live tracker
Vote GenerEOS

If you like our work and want to support charity you can vote for us directly here. All you need to do is enter your account name and click Vote for GenerEOS. Once again, please read the associated ricardian contract so you know what you are agreeing to by using this action.
If you wish to vote for your full allotment of 30 block producers please use a safe and trusted voting portal.
Upcoming Features for the EOSToolkit
- Transfer tokens (wallet)
- Ram market buy/sell
- Staking/unstaking


0 Comments